Page 83 - MSAM-1-3
P. 83
Materials Science in Additive Manufacturing                     Increasing density and strength in binder jetting


            depowdering and removal from the build box. Finally, all   16-bit tiff stack files and imported for processing into ImageJ
            samples were sintered in a fully inert atmosphere filled   software for image preparation and gray scale correction.
            with argon gas. A tube furnace (Carbolite Gero Ltd.) was   AVIZO was used for the visualization and analysis of XCT
            used with the following temperature profile, as shown   data. Segmentation and thresholding of the data were
            in  Figure  4:  (i)  3°C/min ramp to 700°C, 60  min dwell;   performed to extract the material (SS316L) of the printed
            (ii)  3°C/min ramp to 1120°C, 140  min dwell; (iii) cool   cylinder. The total volume of the solid cylinders (without
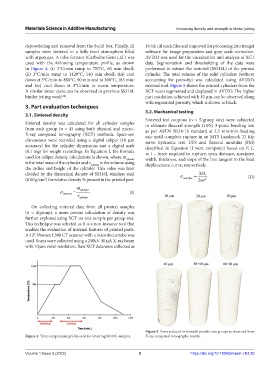
            down at 3°C/min to 850°C, 90 min and to 300°C, 183 min;   accounting for porosity) was calculated using AVIZO’s
            and (iv) cool down at 3°C/min to room temperature.   internal tool. Figure 5 shows the printed cylinders from the
            A similar sinter cycle can be observed in previous SS316L   XCT scans segmented and displayed in AVIZO. The higher
            binder jetting work .                              part resolution achieved with 10 µm can be observed along
                           [24]
                                                               with segmented porosity, which is shown in black.
            3. Part evaluation techniques
                                                               3.2. Mechanical testing
            3.1. Sintered density
                                                               Sintered test coupons (n = 5/group size) were subjected
            Sintered density was calculated for all cylinder samples   to ultimate flexural strength (UFS) 3-point bending test
            from  each  group  (n  =  4) using both  physical  and  micro-  as per ASTM B528-16 standard at 2.5 mm/min loading
            X-ray computed tomography (XCT) methods. Specimen   rate until complete rupture in an MTS Landmark 22 Kip
            dimensions were recorded using a digital caliper (10  µm   servo hydraulic test. UFS and flexural modulus (FM)
            accuracy) for the cylinder dimensions and a digital scale   described in Equation II were computed based on  F, L,
            (0.1 mg) for weight recordings. In Equation I, the formula   w, t – force required to rupture, span distance, specimen
            used for caliper density calculations is shown, where m cylinder    width, thickness, and slope of the line tangent to the load
            is the total mass of the cylinder and v cylinder  is the volume using   displacement curve, respectively.
            the radius and height of the cylinder. This value was later
            divided by the theoretical density of SS316L stainless steel     σ      =  3FL                 (II)
            (8.00 g/cm ) for relative density % present in the printed part.   max flex  2wt 2
                    3
                                  m
                                   cylinder
                           ρ sintered  =  v cylinder    (I)

              On  collecting  sintered  data  from  all  printed  samples
            (n = 4/group), a more precise calculation of density was
            further explored using XCT on one sample per group size.
            This technique was selected as it is a non-invasive tool that
            enables the evaluation of internal features of printed parts.
            A GE Vtomex L300 CT scanner with a microfocus tube was
            used. Scans were collected using a 250kV 40 µA X-ray beam
            with 10 µm voxel resolution. Raw XCT data were collected as


                                                               Figure 5. Pores reduced in bimodal powder size groups as observed from
            Figure 4. Time-temperature profile used for sintering SS316L samples.  X-ray computed tomography results.


            Volume 1 Issue 3 (2022)                         5                      https://doi.org/10.18063/msam.v1i3.20

