Page 10 - MSAM-2-1
P. 10
Materials Science in Additive Manufacturing                           AM-produced CoCrFeMnNi properties


            SLM system  was to be obtained. For this  purpose, laser   equipped with a 3-electrode system, which consists of HEA
            power (P), hatch spacing (H), and layer thickness (T)   sample working electrode, a Ti wire as a counter electrode,
            were fixed at 100W, 60  μm, and 20  μm, respectively,   and Ag/AgCl reference electrode. Area of 10 × 10  mm
            while the laser scanning speed (V) was varied from 200   was  exposed  to  the  electrolyte.  To  ensure a  steady-state
            to 800 mm/s. While this study intends to obtain various   potential, an open circuit potential (OCP) was measured
            energy density input by adjusting the scanning speed   for  1  h.  Potentiodynamic  polarization curves  were
            alone, it is well recognized that other parameters may have   performed at a scan rate of 5 mV/s. Five measurements
            significant effect on the obtained properties [40,41] . Note that   were performed for each condition to ensure the accuracy
            the coding of sample conditions combines the numerical   of the results, which was evaluated by calculating the
            value of SLM laser scanning speed and the status of heat   standard error of these measurements.
            treatment. For instance, 450 AB indicates the condition of
            450 mm/s. The resultant volume energy density, defined   2.2. Material characterization
                                               3
            as  P/(V•H•T),  ranged  104.2  –  416.7  J/mm . As a result,   Cubic specimens obtained in the first stage of SLM
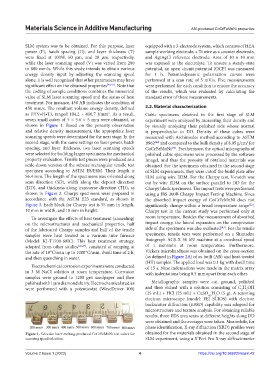
            seven small cubes of 5 × 5.6 × 5 mm were obtained, as   experiment were analyzed by measuring their density and
            shown in  Figure 1. Based on the porosity observation   by visually analyzing their polished side  whose normal
            and relative density measurement, the appropriate laser   is perpendicular to DD. Density of these cubes were
            scanning speeds were determined for the next stage. In the   measured with Archimedes method according to ASTM
            second stage, with the same settings on laser power, hatch   B962  and compared to the bulk density of 8.05 g/cm  for
                                                                                                          3
                                                                   [42]
            spacing, and layer thickness, two laser scanning speeds   CoCrFeMnNi . Furthermore, the optical micrographs of
                                                                          [36]
            were selected for building larger specimens for mechanical   polished cubic specimens were processed by the software
            property evaluation. Tensile test pieces were produced as a   ImageJ, and thus the porosity of obtained materials was
            scale-down version of the subsize rectangular tensile test   obtained. For the specimens obtained in the second stage
            specimen according to ASTM E8/E8M. Their length is   of SLM experiments, they were cutoff the build plate after
            56.4 mm. The length of the specimens was oriented along   SLM using wire EDM. For the Charpy test, V-notch was
            scan  direction  (SD),  width  along  the  deposit  direction   cut by wire EDM on the surface parallel to DD for the
            (DD), and thickness along transverse direction (TD), as   Charpy block specimens. The impact tests were performed
            shown in  Figure 2. Charpy specimens were prepared in   using a JBS-300B Charpy Impact Testing Machine. Since
            accordance with the ASTM E23 standard, as shown in   the absorbed impact energy of CoCrFeMnNi does not
            Figure 3. Each block for Charpy test is 55 mm in length,   significantly change within a broad temperature range ,
                                                                                                           [22]
            10 mm in width, and 10 mm in height.               Charpy test in the current study was performed only at
              To investigate the effects of heat treatment (annealing)   room temperature. Besides the measurement of absorbed
            on the microstructures  and mechanical properties,  half   impact energy, the lateral expansion on the compression
                                                                                               [43]
            of the fabricated Charpy samples and half of the tensile   side of the specimens was also evaluated . For the tensile
            samples were heat treated in a vacuum tube furnace   specimens, tensile tests were performed on a Shimadzu
            (Model:  KJ-T1700-60IC).  This  heat  treatment  strategy,   Autograph AGS-X 50 kN machine at a crosshead speed
            adopted from other studies [26,29] , consisted of ramping at   of 1  mm/min at room temperature. Furthermore,
            the rate of 10°C/min up to 1000 °C/min, dwell time of 2 h,   Vickers microhardness was obtained on the cross-section
            and then quenching in water.                       (as defined in Figure 2A) of as-built (AB) and heat-treated
                                                               (HT) samples. The applied load was 0.1 kg with dwell time
              Electrochemical corrosion experiments were conducted   of 15 s. Nine indentations were made in the matrix array
            in 3 M NaCl solution at room temperature. Corrosion   with indentations being 0.5 mm apart from each other.
            samples  were  ground  to  1200  grit  sandpaper  and  then
            polished with 1 μm diamond slurry. Electrochemical studies   Metallographic  samples  were  cut,  ground,  polished
            were performed with a potentiostat (WaveDriver 100)   and then  etched with a solution consisting  of C H OH
                                                                                                          5
                                                                                                        2
                                                               (25 mL) + HCl (25 mL) + CuSO H O (5 g). A scanning
                                                                                          4.5
                                                                                             2
                                                               electron microscope (model:  FEI SCIOS)  with  electron
                                                               backscatter diffraction (EBSD) capability was adopted for
                                                               microstructure and texture analysis. For obtaining reliable
                                                               results, three EDS area scans at different heights along DD
                                                               were obtained and the averages were taken. Meanwhile, for
                                                               phase identification, X-ray diffraction (XRD) profiles were
            Figure 1. Selective laser melting-produced CoCrFeMnNi test cubes for   obtained for the materials obtained in the second stage of
            scanning speed selection.                          SLM experiment, using a X’Pert Pro X-ray diffractometer


            Volume 2 Issue 1 (2023)                         4                        https://doi.org/10.36922/msam.42

