
Page 23 - BH-2-4
P. 23
Brain & Heart Step by step 3D ICE guided LAA occlusion
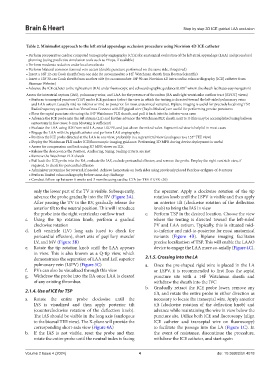
Table 2. Minimalist approach to the left atrial appendage occlusion procedure using Nuvision 4D ICE catheter
• Perform preoperative cardiac computed tomography angiography (CTA) for anatomical evaluation of the left atrial appendage (LAA) and procedural
planning (using predictive simulation tools such as FEops, if available)
• Perform moderate sedation under local anesthesia
• Perform bilateral common femoral vein access (double puncture performed on the same side, if required)
• Insert a 16F 12‑cm Cook sheath from one side (to accommodate a 14F Watchman sheath from Boston Scientific)
• Insert a 12F 30‑cm Cook sheath from another side (to accommodate 10F 90‑cm Nuvision 4D intracardiac echocardiography [ICE] catheter from
Biosense Webster)
• Advance the ICE catheter to the right atrium (RA) under fluoroscopic and echocardiographic guidance (0.035′′ wire in the sheath facilitates easy navigation)
Assess the interatrial septum (IAS), pulmonary veins, and LAA for the presence of thrombus (RA and right ventricular outflow tract [RVOT] views)
• Perform transseptal puncture (TSP) under ICE guidance (select the view in which the tenting is directed toward the left‑sided pulmonary veins
and LAA ostium (usually mid-to-inferior or mid-to-posterior for most anatomical variants). Biplane imaging is useful for precisely localizing TSP.
Radiofrequency systems such as VersaCross Connect with RF pigtail wire (Baylis Medical) are useful for performing precise punctures
• Floss the septal puncture site using the 14F Watchman FLX sheath, and pull it back into the inferior vena cava
• Advance the ICE probe into the left atrium (LA) and further advance the Watchman FLX sheath next to it (this may be accomplished using balloon
septostomy in few cases; 8-mm Mustang is sufficient)
• Evaluate the LAA using ICE from mid‑LA, near LSUPV, and just above the mitral valve. Supra mitral view is helpful in most cases
• Engage the LAA with the pigtail catheter and perform LAA angiography
• Position the ICE probe directed at the LAA in one view, preferably in a supramitral view (analogous to a 135° TEE view)
• Deploy the Watchman FLX under ICE/fluoroscopic imaging guidance. Performing 3D MPR during device deployment is useful
• Assess for compression and leak using 3D MPR views on ICE
• Release the device once the Position, Anchoring, Sizing, Sealing criteria are met
• Remove the Watchman FLX sheath
• Pull back the ICE probe into the RA, evaluate the IAS, exclude pericardial effusion, and remove the probe. Employ the right ventricle view, if
required, to check for pericardial effusion
• Administer protamine for reversal, if needed. Achieve hemostasis on both sides using previously placed Perclose or figure-of-8 sutures
• Perform limited echocardiography before same-day discharge
• Conduct follow‑up between 6 weeks and 3 months using cardiac CTA (or TEE if GFR <30)
only the lower part of the TV is visible. Subsequently, the operator. Apply a clockwise rotation of the tip
advance the probe gradually into the RV (Figure 3A). rotation knob until the LSPV is visible and then apply
After passing the TV in the RV, gradually release the an anterior tilt (clockwise rotation of the deflection
anterior tilt to the neutral position. This will introduce knob) to bring the IAS in view
the probe into the right ventricular outflow tract c. Perform TSP in the desired location. Choose the view
c. Using the tip rotation knob, perform a gradual where the tenting is directed toward the left-sided
clockwise rotation PV and LAA ostium. Typically, this is situated mid-
d. Left ventricle (LV) long axis (used to check for to-inferior and mid-to-posterior for most anatomical
pericardial effusion), short axis of papillary muscle/ variants (Figure 4B). Biplane imaging facilitates
LV, and MV (Figure 3B) precise localization of TSP. This will enable the LAAO
e. Rotate the tip rotation knob until the LAA appears device to engage the LAA more co-axially (Figure 4C).
in view. This is also known as a Q-tip view, which
demonstrates the separation of LAA and Left superior 2.1.5. Crossing into the LA
pulmonary vein (LSPV) (Figure 3C) a. Once the pre-shaped rigid wire is placed in the LA
f. PVs can also be visualized through this view or LSPV, it is recommended to first floss the septal
g. Withdraw the probe into the RA once LAA is cleared puncture site with a 14F Watchman sheath and
of any existing thrombus. withdraw the sheath into the IVC
b. Gradually retract the ICE probe lower, remove any
2.1.4. Use of ICE for TSP tilt, and rotate the entire probe in either direction as
a. Rotate the entire probe clockwise until the necessary to locate the transeptal wire. Apply anterior
IAS is visualized and then apply posterior tilt tilt (clockwise rotation of the deflection knob) and
(counterclockwise rotation of the deflection knob). advance while maintaining the wire in view below the
The IAS should be visible in the long axis (analogous puncture site. Utilize both ICE and fluoroscopy (align
to the bicaval TEE view). The X-plane will provide the ICE catheter and transeptal wire on fluoroscopy)
corresponding short-axis view (Figure 4A) to facilitate the passage into the LA (Figure 1C). In
b. If the IAS is not visible, reset the probe and then the event of resistance, discontinue the procedure,
rotate the entire probe until the neutral index is facing withdraw the ICE catheter, and start again
Volume 2 Issue 4 (2024) 4 doi: 10.36922/bh.4018