Page 86 - MSAM-4-2
P. 86
Materials Science in Additive Manufacturing                               Quality of a 3D-printed steel part


            Table 1. Typical chemical composition of the Tool Steel 1.2709‑A LMF (TRUMPF) powder (wt%) and SEM‑measured values.  38,47
                        Ni       Co      Mo       Ti       Cr       Al       Si, Mn     S, P     C      Fe
            Nominal    17–19    8.5–11   4.5–6   0.6–1.2  <0.5    0.05–0.15   <0.1      <0.01   <0.02   balance
            Measured   14.39    10.73     4       1.36     −        −          −         −       −      Balance
            Abbreviation: SEM: Scanning electron microscopy.

                                                               rather than from any inherent technical superiority. The
                                                               arithmetical mean deviation of the assessed profile on
                                                               LPBF-produced 3D-printed parts typically ranges from 5
                                                               to 50 μm, though it is generally found to be below 20 μm,
                                                               as reported previously. 54
                                                               3.3. Density testing
                                                               The density of the maraging steel was determined using
                                                               the buoyancy method, which is based on Archimedes’
                                                               principle and conducted in distilled water. According
                                                               to this principle, an object submerged either partially or
                                                               fully in a fluid experiences an upward buoyant force equal
                                                               to the weight of the displaced fluid. The measurement
                                                               involved weighing the solid in air and subsequently in an
                                                               auxiliary liquid of known density. Figure 9 illustrates the
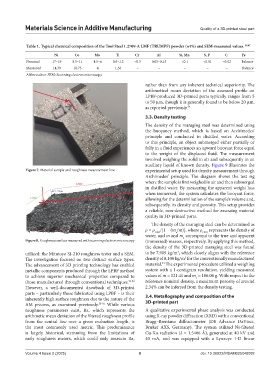
            Figure 7. Material sample and roughness measurement line  experimental setup used for density measurement through
                                                               Archimedes’ principle. The diagram shows the test rig
                                                               where the sample is first weighed in air and then submerged
                                                               in distilled water. By measuring the apparent weight loss
                                                               when immersed, the system calculates the buoyant force,
                                                               allowing for the determination of the sample’s volume and,
                                                               subsequently, its density and porosity. This setup provides
                                                               a reliable, non-destructive method for assessing material
                                                               quality in 3D-printed parts.
                                                                 The density of the maraging steel can be determined as
                                                               ρ = ρ H2O /[1 − (m /m)], where ρ H2O  represents the density of
                                                                            a
                                                               water, and m and m  correspond to the true and apparent
                                                                               a
            Figure 8. Roughness surface measured with scanning electron microscopy  (immersed) masses, respectively. By applying this method,
                                                               the density of the 3D-printed maraging steel was found
                                                                             3
            utilized: the Mitutoyo SJ-210 roughness tester and a SEM.   to be 7,909 kg/m , which closely aligns with the reference
                                                                                3
            The investigation focused on two distinct surface types.   density of 8,100 kg/m  for the conventionally manufactured
                                                                      44
            The advancement of 3D printing technology has enabled   material.  The experimental procedure utilized a weighing
            metallic components produced through the LPBF method   system with a 1-centigram resolution, yielding measured
            to achieve superior mechanical  properties  compared to   values of m = 121.41 and m  = 106.06 g. With respect to the
                                                                                    a
            those manufactured through conventional techniques. 51,52    reference nominal density, a maximum porosity of around
            However, a well-documented drawback of 3D-printed   2.34% can be inferred from the density testing.
            parts – particularly those fabricated using LPBF – is their   3.4. Metallography and composition of the
            inherently high surface roughness due to the nature of the   3D-printed part
            AM process, as examined previously. 53-56  While various
            roughness parameters exist, Ra, which represents the   A qualitative experimental phase analysis was conducted
            arithmetic mean deviation of the filtered roughness profile   using X-ray powder diffraction (XRD) with a conventional
            from the central line over a given evaluation length, is   Bragg–Brentano diffractometer  (D8 Advance  DaVinci,
            the most commonly used metric. This predominance   Bruker  AXS,  Germany).  The system  utilized Ni-filtered
            is largely historical, stemming from the limitations of   Cu-Kα radiation (λ = 1.5406 Å), generated at 40 kV and
            early roughness meters, which could only measure Ra,   40  mA, and was equipped with a Lynxeye 1-D linear


            Volume 4 Issue 2 (2025)                         8                         doi: 10.36922/MSAM025040002

