Page 45 - MSAM-4-3
P. 45
Materials Science in Additive Manufacturing                           AI-driven defect detection in metal AM


            and metallographic images in industrial manufacturing.   assessment. The workflow includes layer-wise high-
            The experimental results demonstrated that a learning   resolution image acquisition, data pre-processing and
            rate of 0.01, Adam optimizer, and Inception-ResNet-v2   annotation, and model optimization through transfer
            network achieved the best classification accuracy for   learning and model evaluation. Results demonstrate that
                                                    31
                                        30
            image classification tasks in AM.  Khan  et al.  used   the proposed object detection approach enables accurate
            optical tomography data, monitored layer by layer, and   and  efficient  defect  localization,  significantly  reducing
            combined random forest algorithms to detect porosity   manual effort and improving build success rates, thus laying
            and lack of fusion defects. Although an accuracy of   the foundation for smarter real-time monitoring in AM.
            99.98% was achieved, the risk of overfitting existed due
            to the small training dataset of only 100 images. Their   2. Methods
            study further proposed that more efficient detection   2.1. Data collection and model selection
            could be achieved with CNNs and larger-scale datasets.
                                                         31
            Abhilash and Ahmed  used the ResNet50 CNN model to   The experiment collected three sets of images from
                             32
            classify AM component surface conditions to determine   EOSTATE PowderBed (EOS Gmbh, Germany), which
            polishing conditions and optimized surface quality while   consists of a high-resolution (2D bitmap data resolution
            eliminating defects, achieving a prediction accuracy of   of 300 – 400 µm) visual wavelength camera on the EOS
            96% and significantly reducing manual inspection and   M290 metal machine. The EOSTATE PowderBed captured
            material waste. Lee  et al.  proposed a local detection   layer images of the printing builds, including defects
                                 33
            method based on 3D-CNN to perform defect classification   (Table 1). The sets contained 1383, 287, and 1016 images
            and local volume fraction prediction, utilizing data from   taken layer-by-layer before and after powder bed melting.
            the  melt  pool  monitoring  system  and micro-computed   The feedstock used for test samples was 316L stainless
            tomography. This method could classify porosities caused   steel. The powder size distribution was Dv(25) = 22 µm,
            by the lack of fusion and locked pores in the PBF-LB   Dv(50) = 37 µm, and Dv(75) = 58 µm, measured using
                                                                                                            35
            process.  Wen et al.  combined simple CNN, YOLOv4,   laser diffraction. The recoating speed was set at 80 mm/s.
                             34
                  33
            and Detectron2 to perform classification, object detection,   AM defects differ from typical object detection targets,
            and segmentation tasks on scanning electron microscopy   as they do not have uniform or consistent contours.
            images  of  AM  parts,  achieving  excellent  accuracy  and   Instead, they are abstract, mixed, and evolve gradually
            defect detection capabilities in static and dynamic videos.  throughout the printing process. For example,  Figure  1
              These studies demonstrate the significant potential   presents grooves formed by debris dragging across the
            of CNNs for defect detection in AM, warranting further   surface, scattered powder, and pits or voids. In the early
            validation of the large-scale image dataset constructed in   stages, slight surface irregularities or powder residues
            this work. Previous approaches have primarily focused on   caused by recoater vibrations may have low contrast against
            binary classification – determining whether defects exist –   the background. However, if these defects are not detected
            without providing spatial localization, which increases the   and addressed in time, they can escalate into more severe
            burden on manual inspection. The demand for agile, real-  issues. The model is expected to identify these subtle defect
            time monitoring also exposes the limitations of pixel-level   patterns early.
            segmentation in practical applications. This study improves   In practical industrial settings, the printing of a single
            detection accuracy based on classification models and   AM part can take up to dozens of hours, depending on its
            further incorporates advanced object detection techniques   size and complexity. On a typical industrial PBF-LB system,
            to enable both identification and localization of defects in   such as the EOS M290, printing one layer alone generally
            metal 3D printing, enhancing model interpretability and   takes between 10 and 60 s. Since, it is difficult to predict
            applicability. All models are trained and systematically   when and where a defect may occur during the process,
            compared on a unified, large-scale dataset to ensure   operators are often required to monitor the build frequently.
            generalizability and provide a comprehensive performance   This manual monitoring is not only time-consuming

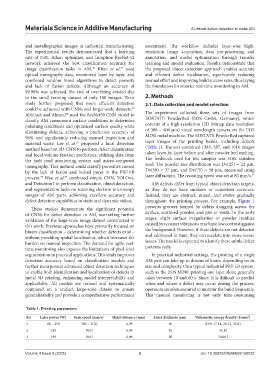
            Table 1. Printing parameters

            Set   Laser power (W)  Scan speed (mm/s)  Hatch distance (mm)  Layer thickness (µm)  Volumetric energy density (J/mm )
                                                                                                          3
            1        80 – 250       780 – 3120         0.09              40             8.89, 17.81, 26.71, 35.61
            2          215           1083              0.09              40                   55.15
            3          195           1083              0.09              20                   100.03


            Volume 4 Issue 3 (2025)                         3                         doi: 10.36922/MSAM025150022

