Page 276 - IJB-10-5
P. 276
International Journal of Bioprinting                                A TPMS framework for complete dentures


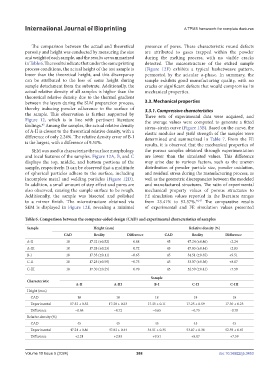
               The comparison between the actual and theoretical   presence of pores. These characteristic round defects
            porosity and height was conducted by measuring the size   are attributed to gases trapped within the powder
            and weight of each sample, and the results are summarized   during the melting process, with no visible cracks
            in Table 6. The results indicate that under the same printing   detected. The microstructure of the etched sample
            process conditions, the actual height of the test sample is   (Figure 12F)  exhibits a  typical basketweave pattern,
            lower than the theoretical height, and this discrepancy   permeated by the acicular  α-phase. In summary, the
            can be attributed to the loss of some height during   sample exhibits good manufacturing quality, with no
            sample detachment from the substrate. Additionally, the   cracks or significant defects that would compromise its
            actual relative density of all samples is higher than the   mechanical properties.
            theoretical relative density due to the thermal gradient
            between the layers during the SLM preparation process,   3.3. Mechanical properties
            thereby inducing powder adherence to the surface of   3.3.1. Compressive characteristics
            the sample. This observation is further supported by    Three sets of experimental data were acquired, and
            Figure  12, which is  in line with  pertinent  literature   the  average values were  computed  to generate a  fitted
            findings.  Among the samples, the actual relative density   stress–strain curve (Figure 13B). Based on the curve, the
                   45
            of A-II is closest to the theoretical relative density, with a   elastic modulus and yield strength of the samples were
            difference of only 2.24%. The relative density error of B-I   determined and summarized in  Table 7. From the FE
            is the largest, with a difference of 9.51%.        results, it is observed that the mechanical properties of
               SEM was used to characterize the surface morphology   the porous samples obtained through experimentation
            and local features of the samples. Figure 12A, B, and C   are lower than the simulated values. This difference
            displays the  top,  middle, and bottom  portions  of  the   may arise due to various factors, such as the uneven
            sample, respectively. It can be observed that a multitude   distribution of powder particle size, powder oxidation,
            of spherical particles adhere to the surface, including   and residual stress during the manufacturing process, as
            incomplete metal and welding particles (Figure 12D).   well as the geometric discrepancies between the modeled
            In addition, a small amount of step effect and pores are   and manufactured structures. The ratio of experimental
            also observed, causing the sample surface to be rough.   mechanical  property values of  porous  structures  to
            Additionally, the sample was bisected and polished   FE simulation values reported in the literature ranges
            to  a  mirror  finish.  The  microstructure  obtained  via   from 23.41% to 92.37%. 46,47  The comparative results
            SEM is displayed in  Figure 12E, revealing a minimal   of experimental and FE simulation values presented

            Table 6. Comparison between the computer-aided design (CAD) and experimental characteristics of samples

             Sample                      Height (mm)                              Relative density (%)
                            CAD          Reality       Difference      CAD         Reality       Difference
             A-II            18        17.32 (±0.52)     −0.68          45       47.24 (±0.86)     +2.24
             A-III           18        17.28 (±0.23)     −0.72          45       47.83 (±0.44)     +2.83
             B-I             18        17.35 (±0.11)     −0.65          45       54.51 (±0.35)     +9.51
             C-II            18        17.25 (±0.59)     −0.75          45       53.07 (±0.36)     +8.07
             C-III           18        17.30 (±0.25)     −0.70          45       52.59 (±0.41)     +7.59
                                                                 Sample
             Characteristic
                                 A-II             A-III            B-I             C-II            C-III
             Height (mm)
               CAD                18               18              18               18              18
               Experimental    17.32 ± 0.52    17.28 ± 0.23     17.35 ± 0.11     17.25 ± 0.59    17.30 ± 0.25
               Difference        −0.68            −0.72           −0.65            −0.75           -0.70
             Relative density (%)
               CAD                45               45              45               45              45
               Experimental    47.24 ± 0.86    47.83 ± 0.44     54.51 ± 0.35     53.07 ± 0.36    52.59 ± 0.41
               Difference        +2.24            +2.83           +9.51            +8.07           +7.59


            Volume 10 Issue 5 (2024)                       268                                doi: 10.36922/ijb.3453

