Page 56 - MSAM-1-3
P. 56
Materials Science in Additive Manufacturing                             Characterization of TPMS structures


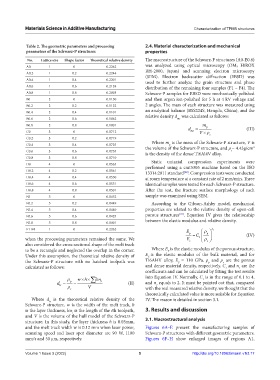
            Table 2. The geometric parameters and processing   2.4. Material characterization and mechanical
            parameters of the Schwarz‑P structures             properties
             No.  Lattice size  Shape factor  Theoretical relative density  The macrostructure of the Schwarz-P structures (A0-E0.8)
            A0        1         0             0.2262           was analyzed using optical microscopy (OM; HiROX
            A0.2      1         0.2           0.2244           RH-2000, Japan) and scanning electron microscopy
                                                               (SEM). Electron backscatter diffraction (EBSD) was
            A0.4      1         0.4           0.2201           used to further analyze the grain structure and phase
            A0.6      1         0.6           0.2124           distribution of the remaining four samples (F1 – F4). The
            A0.8      1         0.8           0.2003           Schwarz-P samples for EBSD were mechanically polished
            B0        2         0             0.1130           and then argon ion-polished for 5 h at 4 kV voltage and
            B0.2      2         0.2           0.1122           2 angles. The mass of each structure was measured using
            B0.4      2         0.4           0.1101           an analytical balance (BSS224S, Hengda, China), and the
            B0.6      2         0.6           0.1062           relative density d  was calculated as follows:
                                                                            mr
            B0.8      2         0.8           0.1001                                   m p
            C0        3         0             0.0712                             d mr    V   s         (III)
            C0.2      3         0.2           0.0719
                                                                 Where m  is the mass of the Schwarz-P structure, V is
            C0.4      3         0.4           0.0725           the volume of the Schwarz-P structure, and ρ = 4.43g/cm
                                                                         p
                                                                                                             3
            C0.6      3         0.6           0.0735           is the density of the dense Ti6Al4V alloy.  s
            C0.8      3         0.8           0.0710
                                                                 Static uniaxial compression experiments were
            D0        4         0             0.0565           performed using a cmt5305 machine based on the ISO
            D0.2      4         0.2           0.0561           13314:2011 standard . Compression tests were conducted
                                                                               [22]
            D0.4      4         0.4           0.0550           at room temperature at a constant rate of 2 mm/min. Three
            D0.6      4         0.6           0.0531           identical samples were tested for each Schwarz-P structure.
            D0.8      4         0.8           0.0501           After  the  test, the fracture surface  morphology  of each
            E0        5         0             0.0452           sample was examined using SEM.
            E0.2      5         0.2           0.0449             According to the Gibson-Ashby model, mechanical
            E0.4      5         0.4           0.0440           properties are related to the relative density of open-cell
                                                                             [23]
            E0.6      5         0.6           0.0425           porous structures . Equation IV gives the relationship
            E0.8      5         0.8           0.0401           between the elastic modulus and relative density.
            F1-F4     1         0             0.2262                            E         n 1
                                                                                  p    C   p           (IV)
            when the processing parameters remained the same. We                E s   1     s
            also considered the cross-sectional shape of the melt track
            to be a rectangle and neglected the overlap in the corner.   Where E  is the elastic modulus of the porous structure,
                                                                        P
            Under this assumption, the theoretical relative density of   E is the elastic modulus of the bulk material, and for
                                                                S
            the Schwarz-P structure with no hatched toolpath was   Ti6Al4V alloy,  E  = 110 GPa.  ρ  and  ρ  are the porous
                                                                                                s
                                                                                          p
                                                                             S
            calculated as follows:                             and dense material density, respectively. C  and n  are the
                                                                                                       1
                                                                                                 1
                                                               coefficients and can be calculated by fitting the test results
                                 wh   len                  into Equation IV. Normally, C  is in the range of 0.1 to 4,
                                                                                       1
                         d    p    V     i          (II)    and n  equals to 2. It must be pointed out that, compared
                                                                   1
                          tr
                                                               with the real measured relative density, we thought that the
                               s
                                                               theoretically calculated value is more suitable for Equation
              Where  d  is the theoretical relative density of the   IV. The reason is detailed in section 3.1.
                      tr
            Schwarz-P structure, w is the width of the melt track, h
            is the layer thickness, len is the length of the ith toolpath,   3. Results and discussion
                                i
            and V is the volume of the hull model of the Schwarz-P
            structure. In this study, the layer thickness h is 0.03mm,   3.1. Macrostructural analysis
            and the melt track width w is 0.12 mm when laser power,   Figures 6A–E present the manufacturing samples of
            scanning speed and laser spot diameter are 90 W, 1100   Schwarz-P structures with different geometric parameters.
            mm/s and 50 μm, respectively.                      Figures 6F–H show enlarged images of regions A1,
            Volume 1 Issue 3 (2022)                         5                      http://doi.org/10.18063/msam.v1i3.17

