Page 58 - MSAM-1-3
P. 58
Materials Science in Additive Manufacturing                             Characterization of TPMS structures


                         A                                                 F


                         B                                                 G


                         C                                                 H


                         D                                                  I


                         E                                                 J


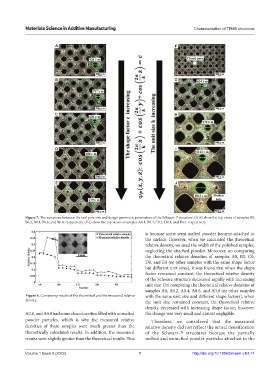
            Figure 7. The variations between the real pore size and design geometric parameters of the Schwarz-P structure. (A-E) show the top views of samples B0,
            B0.2, B0.4, B0.6, and B0.8, respectively. (F-J) show the top views of samples A0.4, B0.4, C0.4, D0.4, and E0.4, respectively.

                                                               is because some semi-melted powder became attached to
                                                               the surface. However, when we calculated the theoretical
                                                               relative density, we used the width of the polished samples,
                                                               neglecting the attached powder. Moreover, on comparing
                                                               the theoretical relative densities of samples A0, B0, C0,
                                                               D0, and E0 (or other samples with the same shape factor
                                                               but different unit sizes), it was found that when the shape
                                                               factor remained constant, the theoretical relative density
                                                               of the Schwarz structure decreased rapidly with increasing
                                                               unit size. On comparing the theoretical relative densities of
                                                               samples A0, A0.2, A0.4, A0.6, and A0.8 (or other samples
            Figure 8. Comparing results of the theoretical and the measured relative   with the same unit size and different shape factors), when
            density.                                           the unit size remained constant, the theoretical relative
                                                               density decreased with increasing shape factor; however,
            A0.6, and A0.8 had some closed cavities filled with unmelted   the change was very small and almost negligible.
            powder particles, which is why the measured relative   Therefore, we considered that the measured
            densities of these samples were much greater than the   relative density did not reflect the actual densification
            theoretically calculated results. In addition, the measured   of the Schwarz-P structures because the partially
            results were slightly greater than the theoretical results. This   melted and unmelted powder particles attached to the


            Volume 1 Issue 3 (2022)                         7                      http://doi.org/10.18063/msam.v1i3.17

