Page 57 - MSAM-1-3
P. 57
Materials Science in Additive Manufacturing                             Characterization of TPMS structures


                        A                               F


                        B


                                                        G


                        C


                        D


                                                        H


                         E


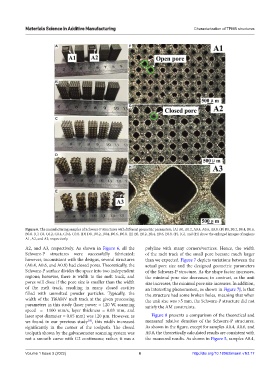
            Figure 6. The manufacturing samples of Schwarz-P structures with different geometric parameters. (A) A0, A0.2, A0.4, A0.6, A0.8. (B) B0, B0.2, B0.4, B0.6,
            B0.8. (C) C0, C0.2, C0.4, C0.6, C0.8. (D) D0, D0.2, D04, D0.6, D0.8. (E) E0, E0.2, E0.4, E0.6, E0.8. (F), (G), and (H) show the enlarged images of regions
            A1, A2, and A3, respectively.
            A2, and A3, respectively. As shown in  Figure 6, all the   polyline with many corners/vertices. Hence, the width
            Schwarz-P structures were successfully fabricated;   of the melt track of the small pore became much larger
            however, inconsistent with the designs, several structures   than we expected. Figure 7 depicts variations between the
            (A0.4, A0.6, and A0.8) had closed pores. Theoretically, the   actual  pore  size  and  the  designed  geometric  parameters
            Schwarz-P surface divides the space into two independent   of the Schwarz-P structure. As the shape factor increases,
            regions; however, there is width to the melt track, and   the minimal pore size decreases; in contrast, as the unit
            pores will close if the pore size is smaller than the width   size increases, the minimal pore size increases. In addition,
            of the melt track, resulting in many closed cavities   an interesting phenomenon, as shown in Figure 7J, is that
            filled with unmelted powder particles. Typically, the   the structure had some broken holes, meaning that when
            width of the Ti6Al4V melt track at the given processing   the unit size was >5 mm, the Schwarz-P structure did not
            parameters in this study (laser power = 120 W, scanning   satisfy the AM constraints.
            speed   =   1100  mm/s, layer thickness = 0.03  mm, and
            laser spot diameter = 0.05 mm) was 120 μm. However, as   Figure 8 presents a comparison of the theoretical and
            we found in our previous study , this width increased   measured relative densities of the Schwarz-P structures.
                                      [15]
            significantly in the corner of the toolpath. The closed   As shown in the figure, except for samples A0.4, A0.6, and
            toolpath shown by the galvanometer scanning system was   A0.8, the theoretically calculated results are consistent with
            not a smooth curve with G2 continuous; rather, it was a   the measured results. As shown in Figure 5, samples A0.4,


            Volume 1 Issue 3 (2022)                         6                      http://doi.org/10.18063/msam.v1i3.17

